Adding solar panels to your roof can increase its weight by 3 to 5 pounds per square foot, and this load must be evaluated alongside snow, wind, and other environmental forces. A thorough roof assessment ensures safety, prevents costly repairs, and meets local building codes. Here's what you need to know:
- Key Risks: Overloading can lead to sagging, leaks, or even collapse. Repairs can cost $3,000 to $8,000.
- Inspection Costs: Hiring a structural engineer for a review typically costs $250 to $500.
- Roof Age: Avoid installing panels on roofs with less than 7–10 years of life left to prevent future reinstallation expenses.
- Structural Factors: Rafters, trusses, and sheathing condition play a critical role in load capacity. Older homes or wide rafter spans may require reinforcement.
- Environmental Loads: Snow loads can exceed 80 psf in some regions, and wind uplift adds additional stress.
- Safety Gear: Use proper equipment like a fall arrest harness, non-slip footwear, and hard hats during inspections.
For most homes, a professional assessment and minor reinforcements are enough to make the roof solar-ready. Prioritize safety and compliance with local regulations before installation.
Tools and Safety Gear for Roof Assessment
Basic Tools You'll Need
To start your roof assessment, gather some essential tools. A ladder is necessary for accessing the roof and attic, where you'll inspect the deck and framing. Bring a flashlight to check attic spaces for signs of water stains, mold, or rot. A tape measure is helpful for verifying rafter or truss spacing, commonly 16 or 24 inches on center, and measuring span lengths. Keep in mind that rafters spanning more than 10 to 12 feet may require additional reinforcement. If available, bring original building plans or blueprints to cross-check the framing system and confirm its design matches the structure.
Safety Equipment
Safety should always be a priority during a roof assessment. Protect yourself from falls and injuries by using the right gear:
- Hard hat: Shields your head from low beams or falling debris.
- Non-slip footwear: Provides better grip on pitched surfaces or dusty floors, reducing the risk of slipping.
- Work gloves: Protect your hands from splinters, sharp edges, or insulation fibers.
- Fall arrest harness: Essential for inspecting steep roof pitches, ensuring you're securely anchored.
- Dust mask or respirator: Helps prevent inhaling dust, insulation particles, or mold spores while working in the attic.
In addition to the list above, double-check that your access methods comply with local safety codes and regulations to avoid accidents or legal issues.
If you need safety checklists, SOPs, or other administrative support, check out Roofing AI.

Building Code and Access Requirements
Properly inspecting a roof means understanding and adhering to building codes. Make sure you can access the attic to measure framing, check spacing, and identify any moisture damage or rot. Local building codes can vary significantly, so consult your local Authority Having Jurisdiction (AHJ) for specific requirements. Key references include the International Building Code (IBC), International Residential Code (IRC), and ASCE 7, which outline minimum design loads for structures.
It's also important to account for environmental factors. For example, in Massachusetts, roofs are typically required to support snow loads ranging from 35 to 50 pounds per square foot. Ground snow load maps and wind zone classifications can guide you in determining these requirements. Some jurisdictions may even require a Professional Engineer (PE) stamp or a certified letter from an architect before issuing permits. Being aware of these standards and regulations ahead of time will help avoid delays and ensure your assessment is compliant with all necessary guidelines.
Understanding Roof Structure and Framing
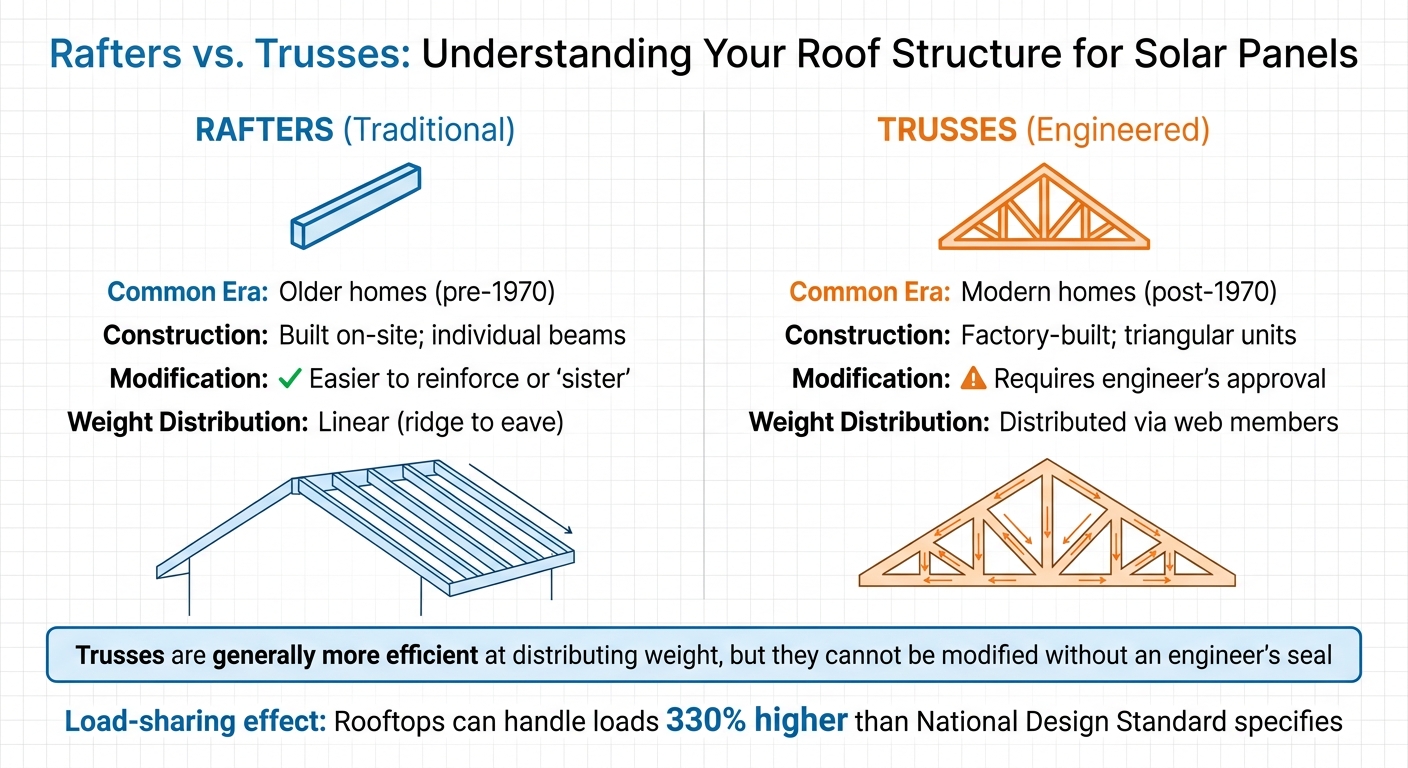
Rafters vs Trusses: Key Differences for Solar Panel Installation
Rafters vs. Trusses
The way a roof is framed plays a big role in how weight is distributed and whether modifications are possible. Rafters, often found in homes built before 1970, are individual beams that run from the roof’s peak to the eaves. These are constructed on-site and can be reinforced by "sistering" them with additional lumber when needed.
On the other hand, trusses are pre-engineered triangular structures, commonly used in homes built after 1970. These are designed as a complete system to distribute weight efficiently through their web members. However, trusses come with a major limitation: they cannot be cut, drilled, or notched unless a licensed structural engineer provides a design. As Boston Solar explains, "Trusses are generally more efficient at distributing weight, but they cannot be modified without an engineer's seal".
The "load-sharing effect" of trusses spreads weight across the entire roof system, including the sheathing and nearby framing parts. Research from Sandia National Laboratories demonstrated that rooftops could handle loads 330% higher than what the National Design Standard specifies. This is due to composite action, where the sheathing, fasteners, and framing work together. For instance, attaching sheathing to a joist with nails can increase its strength, while using glue can strengthen it even more.
Roof Age and Construction Materials
The age of your roof plays a critical role in its ability to support solar panels. Older homes, especially those with original roofing systems, may not meet current building codes for load capacity. Over time, water damage can cause wood rot, cracks, or warping in both rafters and trusses, which reduces their strength.
The type of roofing material also affects whether reinforcement is needed. Heavier materials like concrete, slate, or clay tiles add 9 to 12 pounds per square foot before solar panels are even considered. These roofs are typically built with stronger support systems. In contrast, lighter asphalt shingle roofs might need upgrades to handle the extra weight of solar panels, which add 2 to 4 pounds per square foot.
Homes built before 1960 often used true 2x6 lumber, which requires individual engineering assessments. Meanwhile, homes constructed after 1990 are generally designed to handle the additional 3 to 5 pounds per square foot that solar panels impose.
Since solar panels usually last 25 to 30 years, it’s best to avoid installing them on a roof that will need replacement in the next 5 to 7 years. Aligning the lifespan of your roof with the solar panels avoids the expense of removing and reinstalling the panels later.
Understanding the differences in framing and how materials age is essential before calculating your roof’s load capacity under various conditions.
Calculating Load Capacity and Environmental Forces
Dead Loads vs. Live Loads
When installing solar panel systems, it's important to factor in both permanent (dead) and temporary (live) loads. Dead loads include the constant weight of the solar panels, mounting hardware, and ballast blocks, which remain on the roof at all times. For example, standard rack-mounted solar systems typically add 2.5 to 4 pounds per square foot (psf) to your roof. Most 60-cell solar panels weigh between 35 and 45 pounds, averaging about 2.3 pounds per square foot.
Live loads, on the other hand, are temporary forces such as snow accumulation, wind pressure, or the weight of maintenance workers accessing the roof. In snowy areas like Massachusetts, roofs must handle snow loads of 35 to 50 psf, in addition to the weight of the solar equipment. This means your roof needs to support both the constant weight of the solar array and the temporary forces from environmental conditions.
Several structural factors determine load capacity, including the size and spacing of rafters or trusses (commonly 16 or 24 inches on center) and the span length between supports. Interestingly, research from Sandia National Laboratories indicates that residential rooftops often support loads 330% greater than the minimum requirements outlined in the National Design Standard. This is due to the added strength provided by sheathing nailed or glued to the rafters.
Snow Load by Region
Snow load requirements vary significantly depending on your location. For instance, Massachusetts requires roofs to handle 35–50 psf, while areas like Michigan's Upper Peninsula may exceed 80 psf. These regional differences are critical, as your roof must carry the combined weight of the solar panels and the maximum expected snow accumulation.
Solar panels are typically rated at 5,000 Pascals (Pa) or higher, which allows them to support up to four feet of snow. However, the smooth surface of solar panels often causes snow to slide off, altering how snow accumulates on the roof. While this can reduce the snow load on the panels themselves, the constant weight of the solar equipment affects the roof's remaining capacity for snow.
In regions with heavy snow, roofs with wider rafter spacing (24 inches instead of 16 inches) may require reinforcement. One common method is "sistering", which involves attaching new lumber alongside existing rafters to increase their strength. This is especially important for roofs already burdened by heavy materials like slate or clay tiles, which add a baseline dead load of 9 to 12 psf before solar panels are factored in. If your rafters (e.g., 2x6 or 2x8) span more than 10 to 12 feet without vertical support, reinforcement may be needed to prevent sagging.
Wind Zones and Roof Pitch
Wind forces and roof geometry also play a major role in determining load capacity. Flat roofs, for instance, require ballasted racking systems that add concentrated loads of 5 to 15 psf, compared to the 2.5 to 5 psf added by pitched roofs with penetrating mounts.
Your local wind zone classification, based on geographic location and weather patterns, dictates the structural requirements for solar installations. In areas prone to hurricanes or high winds, denser attachment points and heavier ballast weights are necessary to prevent wind-uplift, particularly on commercial flat roofs. Steeper roofs (greater than 40° pitch) tend to accumulate less snow but face stronger wind pressures, requiring specialized mounting hardware and additional safety precautions during installation.
For most homes, pitched roofs with angles between 15° and 40° strike a good balance. They allow for efficient solar energy production, promote natural snow shedding, and keep wind loads manageable. To ensure the roof can safely support a solar array, check that the plywood or OSB sheathing is at least 1/2 inch thick. This thickness provides sufficient "pull-out" resistance for securely attaching solar mounts.
Identifying Damage and Structural Problems
Visual Inspection Checklist
Once you've evaluated tools and framing, it's time to look for damage that might affect your roof's ability to handle the added weight of solar panels. Start by inspecting your attic with a flashlight. Be on the lookout for water stains, mold, or soft, "spongy" wood along the rafters and ridge board - these are clear signs of weakened wood fibers.
From the outside, examine the roofline from the street. Sagging or bowing could indicate that the framing is over-stressed or already compromised. Pay close attention to the sheathing - the plywood or OSB layer beneath the shingles. Issues like delamination, rot, or crushing at points where rafters meet the deck suggest the material may lack the strength needed for solar mounting hardware to stay securely fastened.
Check for any unapproved modifications to engineered trusses. These trusses are factory-made and shouldn't be altered without a licensed engineer's input. Additionally, review the rafter spacing and spans. Rafters spaced 24 inches apart or 2x6/2x8 rafters spanning over 10 to 12 feet without vertical supports are more likely to sag under the weight of solar panels.
After completing your visual inspection, move on to measuring the deck's thickness to ensure it can handle the load.
Measuring Deck Thickness and Condition
Measure the thickness of the plywood or OSB sheathing in the attic. It should be at least 1/2 inch thick to safely support solar mounting systems. While you're there, check the underside of the deck for moisture damage and confirm the dimensions and spacing of the rafters.
Pay close attention to any signs of moisture damage or wear at the points where rafters connect to the deck. If your roof has less than 5 to 7 years of life left, it's generally recommended to replace it before installing solar panels. Removing and reinstalling panels later can be both costly and inconvenient.
If any red flags come up during your inspection or measurements, it's time to bring in a structural engineer.
When to Hire a Structural Engineer
You should consult a licensed structural engineer if:
- Your home was built before 1960, as older homes often use non-standard lumber sizes.
- Your roof has 24-inch rafter spacing.
- Trusses have been altered.
- There is visible sagging in the roof.
- Your local government requires a Professional Engineer (PE) stamp on the plans
"I've experienced engineering costs that range from $250 to $500 to review, perform calculations and stamp a set of drawings for a standard residential structure." - Chris Giannoumis, Resident Engineer, Standard Energy Solutions LLC
For smaller systems (under 10 kW), engineering costs typically range between 2.5¢/watt and 10¢/watt. If you're dealing with commercial flat roofs and ballasted systems, an engineer will need to evaluate the deck for concentrated loads, which can add 10 to 15 pounds per square foot. If you encounter rot, water damage, or soft wood, it's essential to get a professional structural evaluation right away.
Making Your Roof Solar-Ready
Strengthening Roof Structure
If your roof assessment shows weak or over-spanned rafters, sistering is a common solution. This process involves attaching a matching piece of lumber alongside the existing rafter to boost its strength and stiffness. For instance, if your rafters are 2x6s spanning 12 feet, adding matching 2x6s can help meet the structural requirements needed to support solar panels.
Additional reinforcements like gusset plates and blocking can also help. Gusset plates, made from either metal or wood, strengthen the joints where rafters meet ridge boards or wall plates. Blocking (short pieces of lumber installed between rafters) adds stability and prevents lateral movement. If your roof deck is less than ½ inch thick or shows signs of delamination, replacing the sheathing is necessary to ensure it can handle the pull-out forces from the solar panel mounts.
Getting Engineer Approval and Permits
After reinforcing the roof structure, the next step is to secure professional validation and permits. A licensed engineer will provide a stamped approval (commonly referred to as a Professional Engineer or PE stamp) on your structural calculations and framing plans. This approval accounts for the weight of the solar panels - typically 2.5 to 4 pounds per square foot - as well as environmental factors like snow and wind. The engineer’s stamped documents will detail the reinforcement plan, including lumber sizes and specific nailing patterns.
You’ll then need to submit these stamped documents, along with structural calculations, roof plans, and solar panel layout drawings, to your local building department for approval. Be aware that permitting costs can go into the thousands of dollars, depending on your district. Once the structural work is completed, the engineer might conduct a final inspection and issue a certified letter of approval, clearing the way for the solar installation. Make sure to coordinate with your solar provider during this process to ensure the new supports align with the planned attachment points for the racking system.
Final Readiness Indicators
When all professional approvals and permits are in place, it’s time to confirm the roof’s final condition. A solar-ready roof will have reinforced rafters, no visible sagging, and solid sheathing without signs of delamination or soft spots. If your roof has less than 10 years of service life remaining, consider replacing it before installing solar panels. This can save you from the costly process (ranging from $3,000 to $8,000) of removing and reinstalling the panels later. For more on roofing companies with payment plans, check out the linked article.
The good news? Around 95% of roofs can handle the added load of solar panels without requiring major structural changes. However, before final approval, inspect the attic to confirm the rafter dimensions and ensure the framing is secure. Lastly, verify that the solar modules and mounting assembly meet the Class A fire rating, which is a common requirement for residential properties.
Conclusion
When it comes to solar installation, taking the time to properly evaluate your roof is key to protecting both your home and your investment. A detailed roof assessment covering structural capacity, hidden damage, and external factors like snow or wind lays the groundwork for a safe and successful solar setup. Even newer roofs should undergo inspection to confirm they’re up to the task.
This process includes everything from measuring rafter spans and checking for signs of rot to calculating load capacity. These steps not only ensure your roof can handle the panels but also help you meet local building codes, supporting the reliability of a solar system expected to last 25 years.
If your roof is nearing the end of its service life (typically within 5 to 7 years) replacing it beforehand could save you the cost of removing and reinstalling panels later, which can range from $3,000 to $8,000. For older homes or those with questionable framing, hiring a structural engineer for a review (usually $250 to $500) provides added peace of mind.
FAQs
How can I tell if my roof needs reinforcement before installing solar?
Before installing solar panels, it's crucial to evaluate whether your roof can handle the added weight. Start by checking its load-bearing capacity and overall condition. Pay attention to factors like the roof's age, the spacing of the rafters, and the state of the materials.
Older roofs or those with widely spaced rafters might need extra support to safely accommodate the panels. Additionally, local building codes often dictate specific requirements, so it's a good idea to review them. For roofs that are aging, showing signs of wear, or located in areas prone to heavy snow, consulting a professional engineer or inspector is highly recommended. They can provide expert guidance to ensure your roof is up to the task.
Will solar panels cause my roof to leak or sag over time?
Proper installation of solar panels shouldn’t result in leaks or sagging, provided your roof is in good condition and structurally capable of handling the additional weight. It's essential to evaluate the roof's strength and stability beforehand to ensure it can support the panels and maintain durability over time.
Do I need a structural engineer or a permit for rooftop solar?
Whether you need a structural engineer or a permit largely depends on where you live and the condition of your roof. In many places, local regulations require an engineer's assessment and permits, particularly for older roofs or in areas prone to heavy snow or strong winds. Local building codes may also call for structural evaluations or reinforcements before any installation. It's always a good idea to check with your local authorities to understand the specific requirements in your area.